Saturday, 1 December 2012

Geeky Goodies - More Like Macaroon Puke Off

Molly hinted that she felt I may be at an advantage consider my online name is 'Cupcake'.
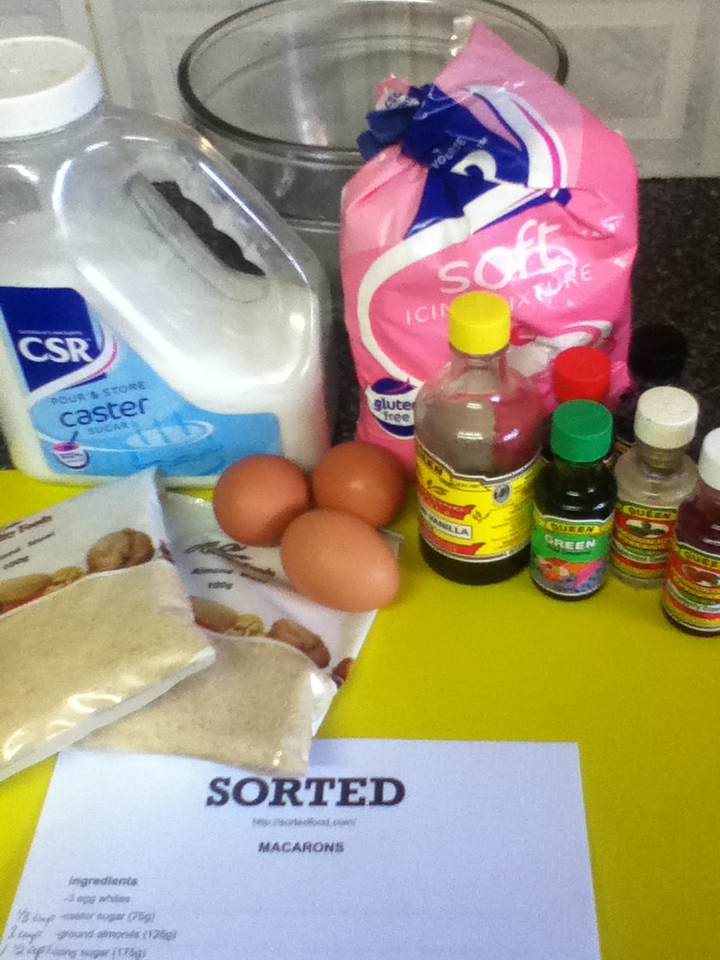
I will be honest that I went into this challenge feeling confident with my baking prowess and I think my over cocky attitude was seen by the baking gods as a sign of blasphemy which they expressed by way of my macaroons.

I used the same recipe as Molly (you can see her fabulous macaroon post & the recipe we used here) which is from Sorted (three/four adorable British men baking simple and delicious recipes).

The baking started off well and I had everything that I needed.
Ingredients, a recipe, confidence..


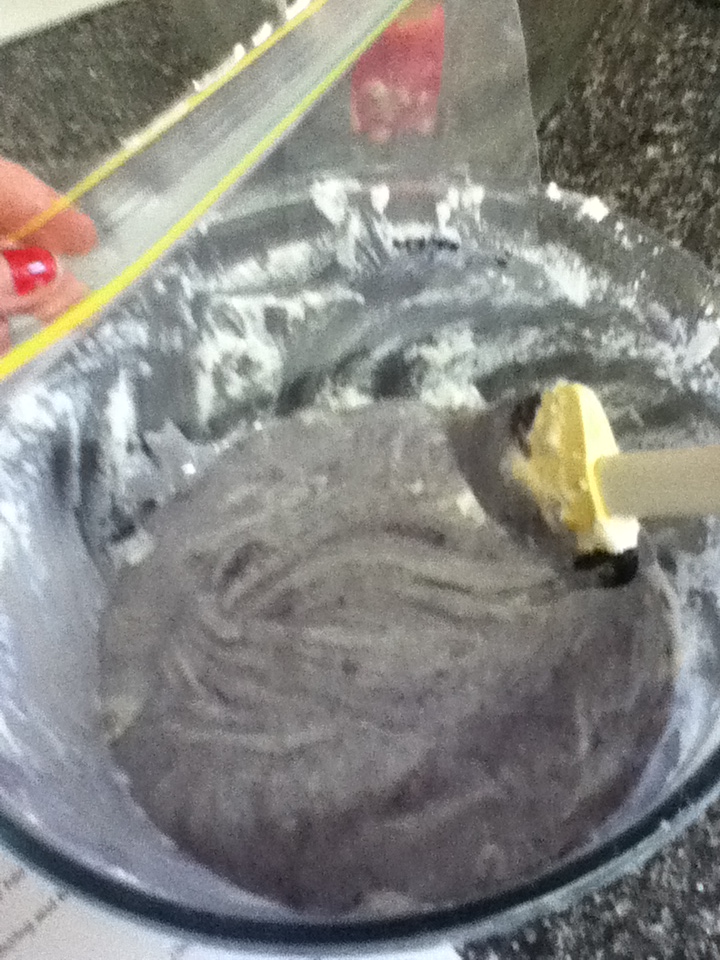
I separated and whisked my whites like I had done many times before..


I added the sugar and beat the shizzle wizzle out of it until soft peaks formed..


Then I sifted the flour and icing sugar and started to fold.. this is when things took a turn...

I COULDN'T KEEP THE AIR IN! The more I folded the more dense I could feel the mixture getting, but it still wasn't totally combined.. I HAD TO KEEP GOING! I paid the price for over mixing and coloured my shameful macaroons accordingly.


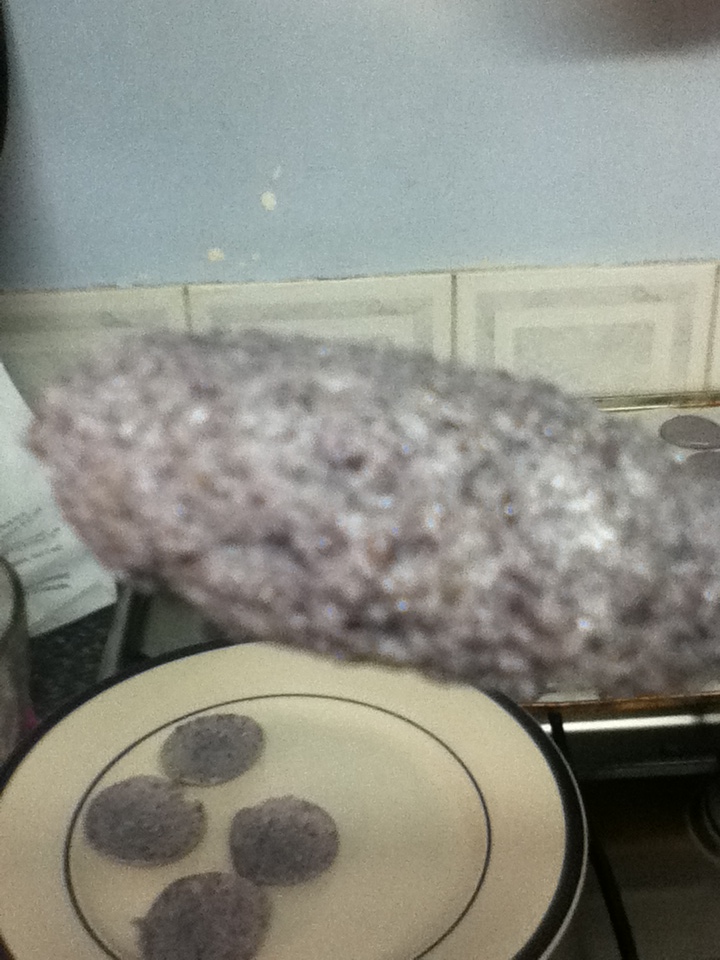
By this stage things were critical.. my spawn were arguing, the dog was barking, I had a sugar-induced headache and I could hear my Galah yelling F*@K OFF from outside. Piping was done with no love. THESE MACAROONS ARE LOVELESS.


Baked. Cooled. Attempted removal requiring an urgent geek-console with Molly.


For the icing I decided a simple purple vanilla. Then it was time for the taste test.


Oh my goodness they are amazing, I can't believe how well they turned out! Now let us never speak of this again. Despite how amazing mine are, Molly definitely won this round.


PS: I am sure you have all noticed the photographic differences between all those pictures and the last? They failed. They ended up silver and stuck to the paper like a symbiotic alien to its human host. I tried to make something out of what I could salvage, I call them 'Cupcake's Own Macafail Saucers'. They also taste disgusting (hence the marshmallows). I think I'll stick to cupcakes.

Friday, 30 November 2012

Geeky Goodies - Macaroon Cook-Off

Hello Fellow Curious Peeps!

This weekend marks the first ever Geeky Goodies Cook-Off between Cupcake and I. With a name like Cupcake, you'd think that she would have an advantage.... But we will see.

We decided to make Macaroons. (Which, by the way, is also the FIRST time I've ever attempted such kitchen sorcery!)

We are both using the same recipe. When I first decided to make Macaroons I went searching for a recipe and it was crazy. Even reading the recipe made me scared. But after some searching on the internet and came across Sorted Food on Youtube, who, not only are funny and full of cooking goodness, are not too bad on the eyes!

So here it is. My attempt (and I must say, a COMPLETE SUCCESS) at making Macaroons.


INGREDIENTS
3 egg whites
castor sugar (75g)
ground almonds (125g)
icing sugar (175g)
flavourings (I used Peppermint Essence)
food colourings (I used blue & green to make Aqua)
fillings (I made a quick Chocolate Buttercream)

Egg & Caster Sugar whisked together.
separate the egg whites from the yolks and in a clean, dry bowl whisk the whites until thick and glossy.
add the castor sugar and whisk again until stiff.
sieve the almonds and icing sugar into the bowl and carefully fold in, retaining as much air as possible.
divide the mixture between three bowls and add the colouring and flavourings to each:-
- raspberry flavour & pink food colouring
- lemon flavour & yellow food colouring
- vanilla flavour & blue food colouring.

I didn't need to divide the mixture, because I only did one colour. But you can do whatever colour/flavour you want!

I missed a photo here! Here's what the bowl looks like after I've scooped the contents into the piping bag.


put each one into a separate piping bag.
line a baking tray with baking paper or a silicon mat and pipe small circles (3cm across) onto the tray, leaving a small gap between each macaroon.


I attempted to decorate some. I sprinkled some left over Almond Meal on some and then tried to flick blue food colouring on some (which is really messy! I need to figure out how to do this properly)

put the tray to one side to rest for 15 minutes to allow a slight skin to form.
preheat the oven to 160°C.
pick the tray up and drop it onto a flat surface from a small height… this forms the ‘feet’ that is associated with macarons.
bake for 15 minutes, then remove and allow to chill at room temperature until completely cold.

At this point I sat down on the floor in the kitchen and watched the Macaroon cook!


I left them in a little too long so some started to brown a little. It doesn't affect the taste, just the way they look!

sandwich the macarons with a filling of choice… raspberry jam (pink), lemon curd (yellow) & nutella (bue).
serve and eat within 48 hours when at their freshest.


The end result. Yummy Chocolate Mint Macaroons! Now to share them with everyone :D

I did it! I successfully made my first ever batch of Macaroons, without any major failings. I'm pretty proud of myself. Now I'm pretty much a pro. The only thing that went wrong was I left them in a little too long and the Almond Meal was a little coarse. Next time I will either make my own Almond Meal or find a finer mix.

THEY WERE AMAZING! Crispy shell and beautifully soft in the centre. Everyone enjoyed them.

I wonder if there is a little pan for making the macaroon nice and round (or I could just use some more practice!)

Stay tuned for Cupcakes post later this weekend :D


Monday, 16 April 2012

Harry Potter - Page To Screen by Bob McCabe

First thing, first. This book is amazing and (even though heaps of people will probably complain) totally worth the price tag.
Also, this is a look and feel review. I plan to read it at my own speed (slow) and will try and do another review when I'm finished.


Harry Potter - Page To Screen, The Complete Filmmaking Journey by Bob McCabe

Purchased (special order that took over 2 months to arrive) from Dymocks.
Price: $110.00 but considering in Sydney at the Harry Potter exhibition they wanted $169.00, $110 is an excellent price.
This book is huge! It weighs 3.5kg (yes I did weigh it) and I was afraid that it wasn't going to fit on my bookshelf (but it does... geek dance). There are 540 beautiful glossy pages, some of them featuring clear embossed images, like shoeprints, wands and feathers, and there are a few fold out pages. Including one of the front featuring some of the main characters.

So, the contents...the book is divided into three parts:

Part I: The Making of Harry Potter 
Introduction 
Setting the Scene 
HP and the Sorcerer's Stone 
HP and the Chamber of Secrets 
HP and the Prisoner of Azkaban 
HP and the Goblet of Fire 
HP and the Order of the Phoenix 
HP and the Half-Blood Prince 
HP and the Deathly Hallows 

This section is full of candid photos (including Voldemort reading a magazine), set design illustrations and behind the scene photos. It also includes strange things, like the characters heights, and tidbits from the various directors.

Part II: The Art of Harry Potter 
Introduction 
Characters: Costuming
Locations: Set Design 
Creatures: Special Makeup and Digital Effects 
Artefacts: Prop Making 

This is my favourite section. It shows the characters costumes, including fabric swatches, information on tattoos, wands and makeup. It also showed art designs of main locations, including a snow covered model of Hogwarts (which is actually covered in salt, not snow) and designs from JK Rowling of Diagon Alley etc.
This section brought back a lot of memories from the Harry Potter Exhibition I went too in Sydney. Props of creatures and random artefacts that I saw, but had forgotten I'd seen.

Part III: Epilogue 
The Golden Boards 
Acknowledgements and Colophon

The last section isn't that exciting, but a little sad. Featuring photos from throughout the filming of Harry Potter, including the last group photos.

I've posted some photos of some of the pages I liked. Sorry about the quality of the photos. I used Hipstermatic, because for some reason my Camera app on my iPhone doesn't work :|

Sirius Blacks' tattoo designs

Barty Crouch Jr aka David Tennant

Severus Snape

My 2 favourite Harry Potter baddies :)
Blueprints of Hogwarts
Blueprints of the covered bridge that leads to Hagrids house.

I hope you enjoyed this quick look at Harry Potter - Page To Screen. When I picked this book up I ordered another Harry Potter book. Harry Potter Film Wizardry. So stay tuned for the review of that one :)


Friday, 13 April 2012

The Cookie Complex

Good evening!

I had no idea what to do my first review on, then I decided to bake cookies...

The Best Rolled Sugar Cookie - Recipe Review

I bake quite often.
I make cupcakes and sweets.
Cookies not so much.


This recipe made about 40 cookies all up.
I did tweak the recipe slightly in that I used self raising flour and omitted the baking soda and I probably added around an extra cup of flour as the dough was way too sticky, such a level of sticky had never been encountered before in my lifetime! The cookies ended up taking 10 - 15 minutes to bake to a light golden brown, I think that was because I cut them quite thick. I also didn't ice them because I was short on time.

I took all 40 to my mum's wake today and within about an hour there were none left. Everybody loved them and I shared the recipe around to a few people. I, personally, thought they were a little dry and lacking in flavour. I imagine they would of been better with the icing, but you can't argue with the consensus right?

All in all I would recommend this recipe, it is easy enough to follow, the end result is apparently delicious and a crowd pleaser. I can imagine them being perfect for making as part of a take home party bag at a kids party or even to just make awesome geeky shapes with them for a party. Cookies ARE party food OK?!

This is the part where I would usually share a photo but two things happened when I wanted to take photos. I was first going to take a photo whilst I was making them, but things got a little sticky. I was then going to take a photo at the wake, but by the time I got around to having time to take one - they were gone. They were cat shaped and displayed in a Tupperware container. I will instead share with you a highly unrelated and hilarious image I came across on the internet today.


(I like space (I am partial to the beauty of nebulae) and cats. WHAT OF IT?)

Thursday, 12 April 2012

Website Review - Polyvore

Hello Geeklings
I've been racking my brain on what to write my first review on (as well as being pressured by certain members of The Curiosity Complex) I've decided to do something easy and review a website.

It's not an overly geeky website from the first view, but once you start creating you find it's a awesome form of inspiration and pretties.

The website is Polyvore.
I've been a member of Polyvore for YEARS! The idea of the game is to create sets. Mini collages from the millions of photos, clothing items, words... anything you can imagine. I use it mostly to create outfits, or fictional characters, but you can use it to create art, or interior design mood boards, there really are no limits.

All your sets are posted to your Polyvore page, and other users can like and comment on sets and also add them to collections. You can create collections of your sets, others sets, items you like or a mixture. There is a style advice area where you can ask and answer style advice questions, but I don't use it so no review of that section.

I can spend hours creating sets, I find it helps alot when I'm feeling really uninspired. You can search Polyvore for other users sets for inspiration, and you can also create and use Templates to create your sets.

So if you haven't already, check it out.